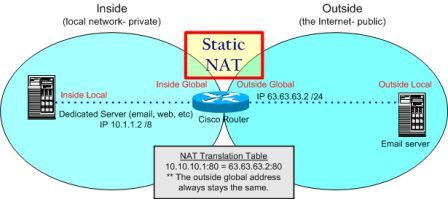
Someone recently asked me how to configure Network Address Translation (NAT) so that computers on the Internet could access his internal Web and mail server through his Cisco router. This requires configuring a static NAT translation between the dedicated public IP address and the dedicated private IP address. Here’s how to do it.
Most people use NAT to connect to the Internet these days. NAT transforms private IP addresses to public IP address so users can access the public Internet. Most of us use a form of NAT calledPort Address Translation (PAT), which Cisco refers to as NAT overload. (For more information, see “How to Set up NAT using the Cisco IOS” and “How to Set up PAT (Port Address Translation) in the Cisco IOS.”)
To start off, let’s get a better idea of what we’re working with. Figure A offers a diagram to help visualize the network.

Here’s our goal: We want to configure a static IP translation through the router from the outside (i.e., Internet) network to the inside (i.e., private) network.
On a Linksys router with a basic Web interface, this isn’t very hard to do. However, on a Cisco router using the command-line interface (CLI), you’ll struggle if you don’t know the proper commands or where to apply them.
It’s a good idea to gather the data you’ll need before you start. Here’s the information we need for our example:
- Router inside interface E0/0: IP 10.1.1.1
- Router outside interface S0/0: IP 63.63.63.1
- Web/mail server private IP: 10.1.1.2
- Web/mail server public IP: 63.63.63.2
There are two important steps to get this traffic inside your network and to your Web/mail server:
- NAT configuration
- Firewall configuration
In this post, I’ll provide the basic static NAT configuration. However, make sure that whatever you’re using for your firewall also allows this traffic in.
Whether you’re using basic Access Control Lists (ACLs) or the Cisco IOS firewall feature set, make sure you understand the Cisco IOS order of operations to configure your firewall for the right IP addresses (public or private). In other words, what happens first — NAT translation or firewall filtering? For example, when using ACLs, a check of the input ACL occurs before NAT translation. So, you need to write ACLs with the public IP addresses in mind.
Now that we’ve covered the background info, let’s get started with configuring static NAT. For our example, let’s say we start out with this basic configuration:
interface Serial0/0
ip address 63.63.63.1 255.255.255.0
ip nat outside
interface Ethernet0/0
ip address 10.1.1.1 255.255.255.0
ip nat inside
We need the NAT translations to translate the outside IP address of the Web/mail server from63.63.63.2 to 10.1.1.2 (and from 10.1.1.2 to 63.63.63.2). Here’s the missing link between the outside and inside NAT configurations:
router (config)# ip nat inside source static tcp 10.1.1.2 25 63.63.63.2 25
router (config)# ip nat inside source static tcp 10.1.1.2 443 63.63.63.2 443
router (config)# ip nat inside source static tcp 10.1.1.2 80 63.63.63.2 80
router (config)# ip nat inside source static tcp 10.1.1.2 110 63.63.63.2 110
We used the above port numbers because they fit the description of what we wanted to do, but keep in mind that your port numbers may be different. I chose port 25 for SMTP (sending mail), port 443 for HTTPS (secure Web), port 80 for HTTP (Web traffic), and port 110 for POP3 (receiving mail from the mail server when out on the Internet).
This configuration assumes you have a block of IP addresses. If you don’t, you can use the outside IP address on your router (Serial 0/0 in our case), and you could configure it like this:
router (config)# ip nat inside source static tcp 10.1.1.2 25 interface serial 0/0 25
You can even use this command if you have a dynamic DHCP IP address from your ISP on the outside of your router.
We also need to register the IP address of the mail and Web server in the global Internet DNS registry. So when users enter www.mywebserver.com in their Web browser, the browser would translate it to 63.63.63.2, and the router would then translate it to 10.1.1.2. The Web server would receive that request and respond back through the router, which would translate it back to the global IP address.
In addition to configuring static NAT, you may want to use dynamic NAT at the same time. With this, your inside PCs could access the Internet using dynamic NAT (i.e., NAT overload or PAT). But this gets a little more complex. For more information, see Cisco’s Configuring Static and Dynamic NAT Simultaneously documentation.
—Resource from techrepublic.com
More Related Networking Tips:
How to Set up NAT Using the Cisco IOS?
How to Configure NAT in Cisco IOS?
How to Set Up PAT (Port Address Translation) in the Cisco IOS?


