While many of you may be familiar with Cisco router upgrades, upgrading the IOS on a Catalyst 2950 switch is different. It uses a few different commands, and the IOS and other files come compressed in a .tar file. Let’s look at how you can get this important upgrade finished in four steps.
Find the proper version of the Cisco IOS
As you know, you can only upgrade your IOS if you meet the following criteria:
- You legally own the IOS on your switch.
- You have Cisco maintenance on that switch that allows you to legally upgrade the IOS.
- You have a Cisco CCO account linked to your maintenance agreement, which allows you to download the upgrade.
Going forward, we’re going to assume you meet all three criteria. Otherwise, you shouldn’t be upgrading your switch — you should be contacting your Cisco reseller to obtain IOS licenses and/or maintenance.
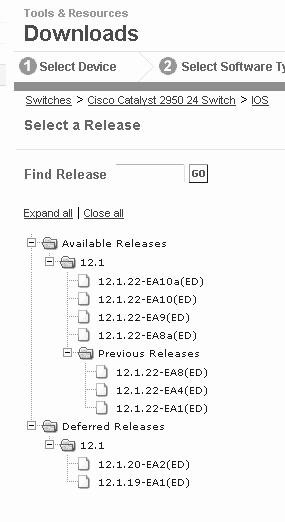
To find the correct IOS version, log into the Cisco Web site, go to the Switches Downloads Web page, and navigate to LAN Switches. The process is just as easy as downloading any other software.
Note: Make sure you locate the proper version of the IOS for your exact model of switch. In addition, make sure you have the edition that your license entitles you to — either standard or enterprise. Figure A offers a screenshot of the Web page.
Figure A
To discuss how to upgrade a Cisco Catalyst switch, we’ll be using a Cisco Catalyst 2950-NON LRE switch for our example. But keep in mind that your upgrade could be slightly different depending on your switch.
To perform the upgrade, you can either use the Cisco Network Assistance (CNA) or the Cisco command-line interface (CLI) to upgrade your switch. Since we recently discussed the advantages of CNA, we’ll use the CLI for this example.
Step 1: Back up your current IOS and configuration file
You don’t want to mess up your switch and then not be able to get it back. If flash corruption occurs, you’ll need a backup copy of your current IOS to fix things.
To determine which IOS is currently running on your switch, use the show version command. Then, copy your current IOS to your PC by running a TFTP server and using the following command:
copy flash:c2950-i6q4l2-mz.121-22.EA8a.bin tftp
Note: Insert the exact name of your IOS because it’s probably different than mine. Figure B shows how I did it.
Figure B
In addition, back up your current configuration file. Here’s an example:
copy flash:config.text tftp
Step 2: Delete the current HTML directory
Note: These instructions are for a switch that does not have the archive download-sw command. If your switch has this command, you can skip the deletion of the HTML files and use the archive download-sw command instead of the archive tar command.
To remove the current HTML files, just use the following command:
delete /r/f flash:html
This deletes the HTML directory and all files it contains, as well as any subdirectories.
Check to see if you have enough room to transfer the new IOS without running out of space. If not, you may have to delete your current IOS as well. In my case, I had to delete both the current IOS and the HTML directory.
Step 3: Copy, extract, and put the upgrade in place
You can accomplish the copying of the IOS and HTML files, the extraction of those files from the .tar file, and the placing of these files with one command. Before doing this, make sure you have a TFTP server running (such as Tftpd32.exe). Then, use the archive command, as shown below:
archive tar /xtract tftp://192.168.1.103/c2950-i6q4l2-tar.121-22.EA10a.tar flash:
Substitute the IP address with the IP address of the TFTP server where you’ve placed the IOS .tar file. In addition, substitute the IOS filename with the name of the file you downloaded from Cisco.
Listing A offers an example of a successful upgrade.
Step 4: Reload the switch
If you were lucky enough to have room for two copies of the IOS, then you’ll need to specify which version you want to boot. Before reloading the switch, use the boot system command in Global Configuration Mode to specify that you want to boot off of the new IOS. This allows you to successfully boot the old IOS if the new IOS gets corrupted or won’t boot for some other reason.
If you only have the new IOS on your switch, just reload your switch with the reload command.
Once you’ve fully reloaded the switch, use the show version command to verify that you’re now running the new version of the IOS. You should see the new version in these two lines of the output:
IOS ™ C2950 Software (C2950-I6Q4L2-M), Version 12.1(22)EA10a, RELEASE SOFTWARE (fc2)
System image file is “flash:/c2950-i6q4l2-mz.121-22.EA10a.bin”
We know our upgrade was a success because our previous IOS version was version EA8a instead of EA10a.
Summary
You can perform this upgrade with either the CLI or CNA. Either way, make sure you back up your current IOS and configuration files before performing the upgrade and reloading the switch. In addition, make sure you have a contingency plan in place in case the upgrade goes bad.
Upgrading a Cisco Catalyst switch isn’t difficult, but it does require the use of some different commands than what you would use to upgrade a Cisco router. For more information, check out Cisco’s Catalyst 2950 and Catalyst 2955 Switch Software Configuration Guide, 12.1(22)EA7 documentation.
—Original Reading from techrepublic.com
More Cisco Switch Tips and Tutorials:
How to Manage Cisco 2950 Switches by IP Address?


